Kirby with Uniform
Heads up! Uniform v3 is there with lots of API changes so this tutorial is outdated. You can find the full documentation with lots of examples over at Read the Docs.
A few weeks ago we released the Kirby Uniform Plugin, the new version of a plugin that allowed the easy implementation of a contact form on a Kirby powered website. With Uniform, we wanted to go a step further, from the simple contact form to a more versatile plugin that can do more than just sending the form data by email.
To do this, we introduced the concept of actions, methods that can perform arbitrary operations with the form data, like performing database interactions, querying a webshop API or … sending the form data by email.
These new abilities resulted in a little more complex and verbose way of using the plugin. As a result, we received multiple questions from developers confused about how they should implement Uniform on their website. Especially the use of the new Kirby controllers seemed to cause problems.
So we decided to offer an exhaustive tutorial on how to implement a working Uniform contact form from scratch. Hopefully you will learn, besides basic usage of Uniform, how powerful the plugin can be and leave you with ideas for new cool actions!
Getting started
We assume you have some basic knowledge about using the command line, Git and how a Kirby website works. If not, let’s get you started on the Shell, Git or Kirby first. Don’t worry, you don’t have to become a guru to follow this tutorial, but you should know why we can use applications without clicking any buttons, what these “repository” thingies are and why we are talking about “templates” and “controllers”.
Plain and simple
To start from scatch, we want a clean install of Kirby without any distracting content. The Plainkit is an excellent choice, so let’s clone it to your development directory:
git clone --recursive git@github.com:getkirby/plainkit.git uniform-tutorial
Then cd into the new uniform-tutorial directory and run the local PHP development server:
php -S localhost:8000
Now open a browser at localhost:8000 and you should see the home page of the plainkit. Neat!
Configuration
The Uniform plugin uses language variables e.g. for displaying error messages. To let Kirby know which language variables it should use, we need to configure at least one language (even if you don’t plan to support multiple languages).
Open site/config/config.php and append the following to the end of the file:
c::set('languages', array(
   array(
      'code'    => 'en',
      'name'    => 'English',
      'locale'  => 'en_US',
      'default' => true,
      'url'     => '/'
   )
));
This will set the default and only language of the website to English. Because Kirby can speak English now, we need to specify the language for all the content files. This is done by changing the file extensions from .txt to .en.txt. So in our clean plainkit installation, we have to walk through the content/ directory and rename site.txt, error.txt and home.txt to site.en.txt, error.en.txt and home.en.txt respectively.
We need this step for the Kirby Panel to work properly later on. If the panel is configured to use a language but the content files don’t have the proper file extensions, it will load e.g. home.txt but save home.en.txt, letting you end up with a lot of trouble.
Now the site is properly configured we can head on to installing the plugin!
Installing Uniform
In a previous blog post we showed how Kirby plugins can be managed as Git submodules. This practice could be followed here, too! But for simplicity we’ll install the plugin the conventional way. Besides, we had to experience the unfortunate incompatibility of symlinks and FTP with some of our client projects, so, while offering less maintainability, the conventional way is more robust.
Let’s download the source of the v2.0.0 release of Uniform. Check if there is a newer release at the time you read this (although some implementation details may vary).
The plugin is installed in three steps:
- Extract the
uniformdirectory from the ZIP tosite/plugins/so you’ll end up with a newsite/plugins/uniform/directory containing the source of the plugin. - Extract the
languagesdirectory from the ZIP tosite/. This directory contains all the available language files for the plugin. Since in this tutorial the only language is English, you can safely delete all files buten.php. - Extract
uniform.csstoassets/css/. In a real setup you can append the content of this file to your own CSS instead.
Since uniform.css is the only CSS of our site, we still need to include it in the site/snippets/header.php. With a real site you’d probably already have done this with your own CSS:
<!DOCTYPE html>
<html lang="en">
<head>
   <meta charset="utf-8" />
   <meta name="viewport" content="width=device-width,initial-scale=1.0">
   <title><?php echo $site->title()->html() ?> | <?php echo $page->title()->html() ?></title>
   <?php echo css('assets/css/uniform.css') ?>
</head>
<body>
Now the plugin is set and ready, we can go on to implement the page controller.
The Controller
Controllers were newly introduced in Kirby 2 and some of you may still be unsure on what they are for and how to use them. Controllers should be used to “separate logic and form”, meaning that the HTML in your template is not messed up with too much PHP code. A controller is the perfect place for the initializaton of the Uniform plugin!
Controller Basics
First we need to create a new controller. Controllers live in the site/controllers/ directory (which doesn’t exist yet) and are always named after their corresponding template. Since we will be using only the single default template of the Plainkit, we’ll now create a new empty controller site/controllers/default.php:
<?php

return function($site, $pages, $page) {
   return array();
};
The controller is basically a function that is called before the template is rendered, returning an array of variables that should be passed on to the template. It can use the $site, $pages and $page variables just like you’d expect in the page template.
Uniform Initialization
Let’s populate the empty controller with our Uniform initialization:
<?php

return function($site, $pages, $page) {

   $form = uniform('contact-form', array(
         'required' => array('_from' => 'email'),
         'actions'  => array(
            array(
               '_action' => 'email',
               'to'      => 'private@mail.tld',
               'sender'  => 'info@my-domain.tld',
            )
         )
      )
   );

   return compact('form');
};
The plugin is invoked by a single call to the uniform() function that takes two arguments. The first is a unique form identifier and the second is the array of options.
Here we tell Uniform that we require the presence of a field named _from which contains a vaild email address. This field is mandatory for the email action to work properly. There may be more fields present in the form but if they are not required, form validation won’t fail when they are empty.
By adding an array with the _action value email to the actions, we tell Uniform to perform the email action with the form data, once everything is validated and correct. This action is our best friend and will simply send an email with the form data to the address specified in to. The sender of the email should be an email address belonging to the server that hosts your website, since it is the one dispatching the email.
The uniform() function then returns a form object that can be used for user feedback in the template. To be able to use the $form variable in the tempate we need to return it from the controller function. Note the cool compact() function that conveniently creates key-value arrays from variables.
You can read more on the options of the uniform function or the otions of the email action to learn what other cool things they can do.
Let us now head over to the template to finally implement the form!
The Template
We created a controller for the default template so let’s open site/templates/default.php and add our form:
<?php snippet('header') ?>

<style type="text/css">
   label {display: block;}
   .erroneous, .error {color: red;}
   .success {color: green;}
</style>

<h1><?php echo $page->title()->html() ?></h1>

<form action="<?php echo $page->url()?>" method="post">

   <label<?php e($form->hasError('_from'), ' class="erroneous"')?> for="email">E-Mail</label>
   <input type="email" name="_from" id="email" value="<?php $form->echoValue('_from') ?>" required/>

   <label for="message">Message</label>
   <textarea name="message" id="message"><?php $form->echoValue('message') ?></textarea>

   <label class="uniform__potty" for="website">Please leave this field blank</label>
   <input type="text" name="website" id="website" class="uniform__potty" />

<?php if ($form->hasMessage()): ?>
   <div class="message <?php e($form->successful(), 'success' , 'error')?>">
      <?php $form->echoMessage() ?>
   </div>
<?php endif; ?>

   <button type="submit" name="_submit" value="<?php echo $form->token() ?>"<?php e($form->successful(), ' disabled')?>>Submit</button>

</form>

<?php snippet('footer') ?>
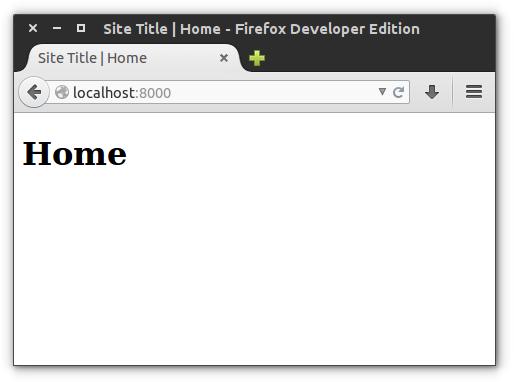
Now the Plainkit home page should look like this:
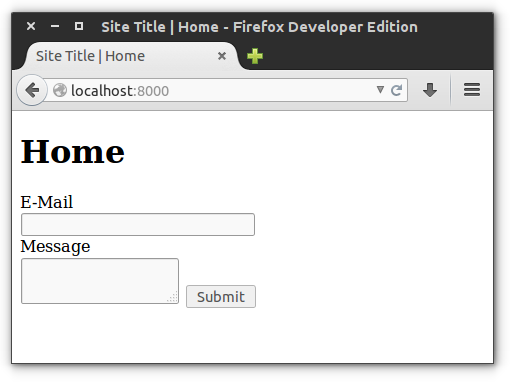
That’s a lot of code so let’s walk through the form step by step.
Form Action
<form action="<?php echo $page->url()?>#form" method="post">
   <!-- ... -->
   <button type="submit" name="_submit" value="<?php echo $form->token() ?>"<?php e($form->successful(), ' disabled')?>>Submit</button>
</form>
You see, the form data is POST-ed to the URL of the same page the form is displayed on. We could achieve similar behavior by simply leaving the action attribute empty but this is not recommended (think of an IFrame displaying your form and grabbing all your visitors data)! Instead we use the url() function of the page and feel a lot more secure.
Speaking of security, you’ll spot $form->token() as the value of the submit button. The token is generated by Uniform and submitted along with the other form data to prevent CRSF. Without the token, the form will refuse to work, so it is important to include it and name the submit button _submit!
Another Uniform method is used here, too. If the form was sent successfully, we’d like to disable the submit button. To do this, we check $form->successful() and add the disabled attribute if it returns true.
Do you wonder where the $form variable came from in the template? Straight from the controller of course!
Old Form Data
<input type="email" name="_from" id="email" value="<?php $form->echoValue('_from') ?>" required/>
This is the form field the user should enter their email address into. Since we told Uniform to validate this field, it will refuse to perform the actions if the entered email address were invalid. Normally this would result in a page reload, wiping all the form data and requiring the user to enter it all over again. This would be pretty annoying, especially for large forms.
Luckily Uniform can remember the already entered form data and re-display it if anything should go wrong. To retrieve the old content of a form field, identified by its name attribute, we can use the echoValue() function. Convenient!
User Feedback
Usually we’d like to show some sort of feedback to the user if the form was submitted successfully or if anything went wrong. Especially if anything went wrong.
<style type="text/css">
   label {display: block;}
   .erroneous, .error {color: red;}
   .success {color: green;}
</style>
<!-- ... -->
<label<?php e($form->hasError('_from'), ' class="erroneous"')?> for="email">E-Mail</label>
<!-- ... -->
<?php if ($form->hasMessage()): ?>
   <div class="message <?php e($form->successful(), 'success' , 'error')?>">
      <?php $form->echoMessage() ?>
   </div>
<?php endif; ?>
Here we use two Uniform functions to display feedback.
The hasError() method checks if a form field caused an error. If the user entered an invalid email address into our form, this method would cause the erroneous CSS class to be added to the label of the email field, which will then be displayed red.
Uniform can tell the user what exactly went wrong, too. For this we display the feedback message with echoMessage(). The feedback message doesn’t have to be an error message; the message for a successful submission is displayed here, too! Error and success feedback messages are visually distinguished by the success and error CSS classes.
Spam Protection
<label class="uniform__potty" for="website">Please leave this field blank</label>
<input type="text" name="website" id="website" class="uniform__potty" />
If you asked yourself why we needed to include some CSS to install Uniform, this is why. Uniforms default spam protection mechanism is a honeypot field that is hidden (by CSS) from normal users. Spam bots, however, perceive this as a perfectly ordinary form field and try to fill it with spam. If this field contains any data, Uniform will refuse to perform any actions.
Note, how the default name of the honeypot field is website to attract most attention of the spam bots. Poor bots!
Now you should be able to understand everything that is going on in the template. Let’s have a look if is working, too!
The Result
Let us first try to break things, because success is boring, right? Try to enter an invalid email address like e@mail (missing the top level domain) and submit the form. This is a little trick, because strictly speaking e@mail would be a valid email address, hence passing the validation of the browser. But PHP is a little more strict so the server side validation will fail:
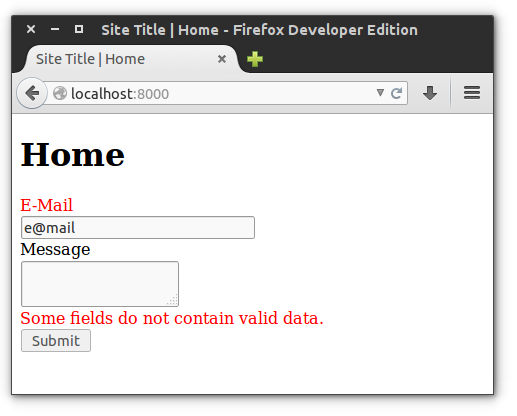
The old form data is still there, the error CSS classes are applied and the feedback message is displayed. Cool!
Now let’s try a successful submission with a valid email address:
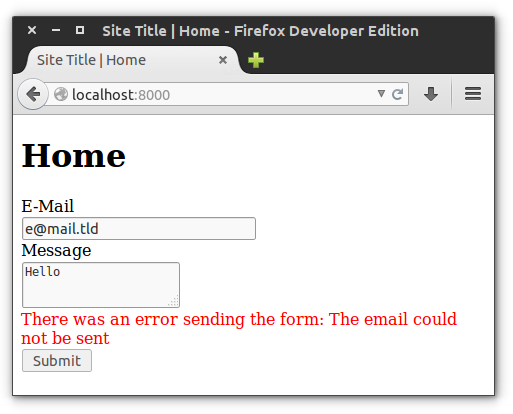
Wait, this form should have been successfully submitted, why is it still failing? Unfortunately (most) local development setups are not able to dispatch real emails so we simply can’t make our form work. Sad! On a real webserver, though, the email would have been successfully dispatched and we would see this:

Just try it on a real server.
Conclusion
Hopefully now you know how to create your own web forms using the Kirby Uniform plugin. And remember: the plugin is not restricted to sending the data by email. Currently the email action is the only built-in action of Uniform but you can implement your very own actions, too. Let us know in the comments if you’d like us to write another blog post on how to implement custom Uniform actions!
If you still have questions or difficulties using the plugin, feel free to comment or open a new issue on GitHub.
Update
If you have any questions, please use the official Kirby forum from now on. Disqus comments are just not the right place for lengthy explanations and in the forum others can find the solutions much easier than here. Use a mention (@mzur) or uniform tag so I will get notified of new topics. Thanks!